A garage door plays a vital role in our daily routines, providing security, convenience, and functionality. Central to this system are garage door springs, which bear much of the door’s weight, enabling smooth operation. When one of these springs breaks, it can disrupt your day, posing both safety concerns and repair challenges. This guide will walk you through the process of repairing a broken garage door spring, covering everything from types of springs to step-by-step instructions on fixing them. However, safety is paramount, so we’ll emphasize precautions and when to call in a professional.
What Are Garage Door Springs and Why Are They Important?
Garage door springs are essential components of your door’s mechanism. Think of them as the muscle behind the operation. When you lift or lower the door, the springs provide the tension and resistance necessary to counterbalance the door’s weight. Without functioning springs, lifting the door manually becomes nearly impossible, and using your garage door opener can strain its motor.
Garage doors can weigh hundreds of pounds. The springs make this weight manageable by storing mechanical energy as they stretch or coil. When springs are in good working condition, they ensure the door operates smoothly and safely. When one breaks? The balance is disrupted, leading to potential issues like doors slamming shut, uneven movement, or the inability to open the door altogether.
Types of Garage Door Springs
Understanding the type of spring on your garage door is essential for repairs. There are two main types of garage door springs:
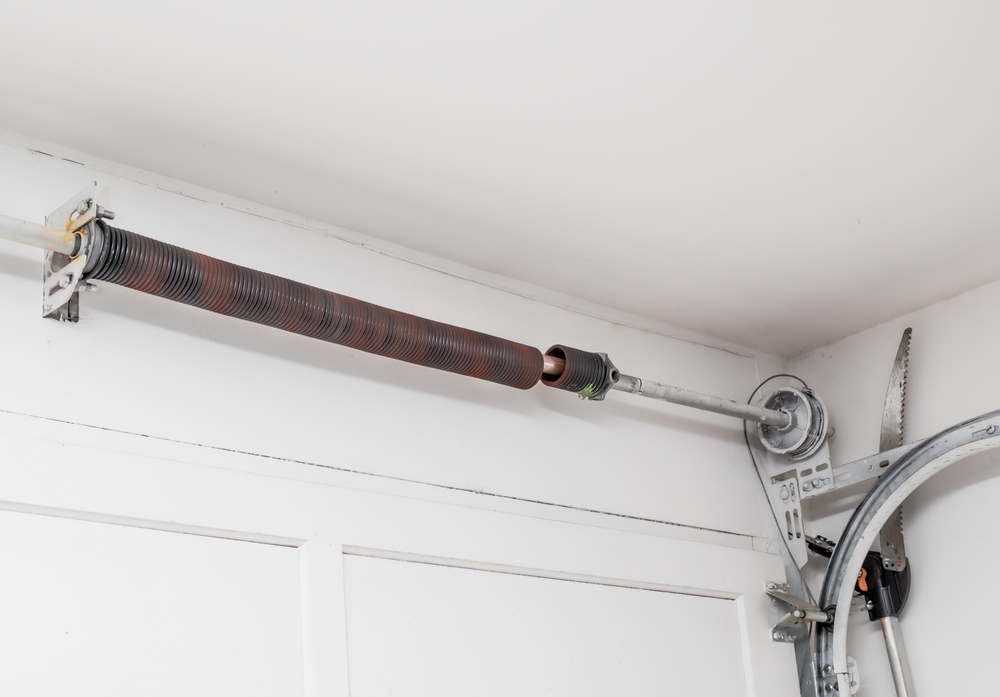
1. Torsion Springs
Torsion springs are mounted horizontally above the garage door, on a metal shaft. These springs work by winding and unwinding to store mechanical energy. They are generally more durable and reliable than extension springs. Torsion springs are commonly used in modern garage door systems and are preferred because they provide smoother movement and better control over the door’s balance.
2. Extension Springs
Extension springs are located on either side of the garage door, running parallel to the tracks. They extend and contract to counterbalance the door’s weight. While less expensive upfront, extension springs are more prone to wear and tear and might not last as long as torsion springs. They’re also slightly less safe, as a failed extension spring can snap and fly across the room if no safety cables are installed.
Understanding which type of spring you’re working with will determine the replacement parts you’ll need and the process involved in the repair.
Signs of a Broken Garage Door Spring
How can you tell if your garage door spring is broken? Here are the most common warning signs:
Loud Bang or Snap Noise
When a spring breaks, it often releases pent-up tension with a loud snap or bang. This sound is a clear indication that something is wrong.
Garage Door Won’t Open or Feels Heavy
If the door suddenly becomes too heavy to lift or the opener struggles to move it, the spring might be broken. Springs bear most of the door’s weight, so the loss of tension results in difficulty operating the door.
Door Slams Shut
A functioning spring ensures smooth operation. If the door closes too quickly or slams, the spring may have lost its ability to balance the weight.
Visible Gap or Damage in the Spring
Inspect your springs. A broken torsion spring will often have a clear gap in its coil, while extension springs might appear stretched or deformed.
Uneven Door Movement
If an extension spring on one side has broken, your door might lift unevenly.
Knowing these symptoms can save you from further damaging your door or accidentally injuring yourself by forcing it to operate.
Safety Precautions Before Attempting Repairs
Before you jump into repairing a broken garage door spring, stop and consider the safety risks. Replacing a spring involves handling extreme tension, and improper handling can lead to serious injury or property damage. Here’s how to stay safe:
Disconnect Power to the Garage Door Opener
Unplug your opener and ensure no one can activate it accidentally while you’re working.
- Work in a Clear Space
- Remove all cars, bikes, and clutter around the door for safe maneuvering.
- Wear Protective Gear
- Safety goggles, gloves, and sturdy footwear are non-negotiable.
- Use the Right Tools
Using low-quality or makeshift tools can increase the chance of accidents. Invest in sturdy tools meant for this purpose.
Release Tension Carefully
Springs can release sudden, violent force. Familiarize yourself with the spring system before starting and proceed cautiously.
If you feel uncomfortable at any point, don’t hesitate to call a professional.
Tools Required for the Job
Gather all the necessary tools before starting. This ensures efficiency and minimizes mistakes. Here’s what you’ll need:
- Winding bars (for torsion springs)
- Clamps or locking pliers
- Socket wrench set
- Adjustable wrench
- Ladder
- Safety goggles and gloves
- Measuring tape
Replacement springs (make sure they match the specifications of your old springs)
For extension springs, you may also need safety cables if they’re not already installed. Double-check your specific garage door’s requirements.
Step-by-Step Guide to Repairing a Broken Spring
Step 1: Identify Your Spring Type
Inspect your garage door to confirm whether it uses torsion springs or extension springs. The process differs depending on the type.
Step 2: Disconnect the Garage Door Opener
Unplug your opener and pull the emergency release cord to disengage the door from the opener. This lets you manually operate the door for the repair.
Step 3: Secure the Door
Use clamps or locking pliers to hold the door firmly in place on the track. This prevents it from accidentally dropping during the repair.
Step 4a: Replacing a Torsion Spring
- Release Tension from the Old Spring
- Insert winding bars into the torsion spring cone and carefully unwind it. Follow your specific spring’s tension release process to avoid injury.
- Remove the Broken Spring
- Loosen the set screws on the cone and slide the damaged spring off the shaft.
- Install the New Spring
Slide the new spring onto the shaft, ensuring it’s positioned correctly (left-wound or right-wound depends on the side of the door). Secure it with the set screws.
Reapply Tension
Use winding bars to wind the new spring back to the correct level of tension. This step requires precision, as too little or too much tension can cause operational problems.
Step 4b: Replacing Extension Springs
- Remove the Broken Spring
- Disconnect the safety cable (if present) and unhook the broken spring.
- Install the New Spring
- Hook the new spring to the track hanger and the door bracket. Reattach the safety cable securely.
- Test the Door Operation
- Reconnect the garage door opener, and test the door to ensure smooth movement.
Step 5: Recheck All Components
Inspect the spring attachments, cables, and pulleys for proper alignment and secure fastening. Clean up your workspace and ensure all tools are stored safely.
Step 6. Test the Door
Once the repair is complete, reconnect power to the opener, lift and lower the door a few times, and observe its operation. If anything seems off, recheck your work.
When to Call a Professional
While it’s tempting to save money with a DIY repair, there are times when calling a professional is the safer option. Consider hiring an expert if:
- You lack the proper tools or experience.
- You have difficulty identifying the type or size of your spring.
- Your garage door has additional issues, like damaged cables or rollers.
- You’re unable to safely release or apply spring tension.
- You’re unsure about the repair process and don’t feel confident.
Professional garage door technicians have the knowledge and tools necessary to complete the job safely and efficiently. While it may cost more upfront, it can save you from potential injuries or expensive mistakes.
Conclusion
Repairing a broken garage door spring is a complex but manageable task if you have the right tools, knowledge, and confidence. Start by determining your spring type and diagnosing the problem. Follow safety precautions diligently, using appropriate tools to safely replace the damaged spring. If you’re unsure about any step, it’s best to contact a professional to handle the repair.
Garage door springs endure a lot of wear and tear over time, and they should be replaced periodically even if they don’t break. Proper maintenance and timely replacements ensure the longevity of your garage door system.
With this guide, you’re better equipped to tackle a broken garage door spring. Whether you decide to DIY or bring in the pros, the key is to prioritize safety and ensure the job is done correctly.